This tutorial covers how to add, configure and modify Text using Tailor Brands advanced website builder.
Website Builder Tutorials
Tailor Brands offer value for money website hosting. Even better, you can create up to a three page website for free. This gives the advantage of learning and becoming familiar with the website builder. When you are ready, you will need to purchase a plan to publish the website. There are three subscription plans available and you can choose which plans suits you.
A great place to start is to use one of the ready made templates and modify and change the template accordingly. You can view some of the templates here -
templates
Getting Started with Tailor Brands
Logo Design Builder
Before you can use the Website Builder, you will need to create a logo regardless if you will be using it. You will also need to sign up for a free account. The following tutorial explains how to use the logo design builder and how to sign up for an account.
Points to note:
- You can not change the company/business name or logo once you sign up to a subscription plan
- You can create and save as many logo designs as you wish
- You do not have to use the created logo design for your website - you can use your own
- You will need to purchase a subscription in order to download the logo
Automatic Website Builder
A quick and easy way to get a website up and running is to use Tailor Brands Automatic Website Builder. This website can be built for free but will need a subscription plan to publish on the internet.
Although a great place to start for a complete beginner, the website is somewhat limited and can be updated using the advance editor.
Points to note:
- It is free to use the Automatic Website Builder
- The website has limited functionality but is a good place to start for a complete beginner
- You will need to purchase at least the Basic Plan to publish the website on the internet
- You will also need to purchase a domain name prior to publishing
- There is no way to revert back to the automatic website builder once the advanced editor has been selected
Domains
Before you can publish a website, apart from a subscription plan, you will also need to have a domain name. A domain name can be purchased through Tailor Brands and is good value for money especially if you also purchase the domain privacy. You can have a free domain name for a year if you sign up for at least the standard subscription plan - saving you even more money.
You are unable to transfer in a domain name but you can connect an externally purchased domain.
The following tutorial explains how to purchase a domain through Taylor Brands as well as to connect an externally purchase domain.
Points to note:
- Tailor Brands do have value for money purchase plans for the domain name and domain privacy. The renewal costs are low as well
- The Domain Name is your online real-estate so needs to be something branded to you, your product or service.
- If you are running a business, then aim to include keywords that describe your business i.e. www.myhomebusiness.com, www.petfood.com, www.cheapcars.com etc.
- Check the domain name is available for your business
- Consider the following when deciding on a domain name: avoid hyphens, although there is nothing stopping you doing this; keep the domain name simple; make it something easy to spell; keep the name as short as possible; make it memorable; use a .com which is universally known and used
Tailor Brands Subscription Plans
Before you can publish a website you will need a domain name and apply for a subscription plan. There are three plans to choose from - Basic, Standard and Premium. There is also a premium plus plan which is not transparent and this is used for ecommerce stores.
Standard Plan Information
Premium Plan Information
Premium Plus Plan Information
Advanced Website Builder Fundamentals
Advanced Website Builder - Overview
This tutorial provides an overview for the Advanced Website Builder along with some key pointers to get started. This tutorial combined with other tutorials on this page should help anyone wanting to build a website.
Points to note:
-
Uploading Your Own Logo
This tutorial covers how to import your own logo as opposed to using the logo generated by Tailor Brands.
When in the website builder, go to Content, Business info and "Replace" the business logo.
Points to note:
-
Advanced Website Builder - Rows, Columns, Sections
This tutorial covers how to insert rows, inner rows, columns and sections using Tailor Brands advanced website builder.
Points to note:
- You can add rows either through the design menu, adding widgets or copying and pasting a row
- Consider adding in sections as these are already made up. You just need to tailor these to your requirements
Advanced Website Builder - Images in a Row
This tutorial covers how to add, configure and modify images in a row using Tailor Brands advanced website builder.
Points to note:
- When uploading your own images, ensure the image file size is compressed and the image size is approximately to the size required on the website. You can use the Adobe image resize tool and use the Optimiziller file compression tool respectively
Advanced Website Builder - Editing Images
This tutorial covers how to configure and edit images using Tailor Brands advanced website builder.
Points to note:
-
Advanced Website Builder Widgets
Advanced Website Builder - Text
Points to note:
- You start by configuring the global text for both paragraph and title text
- You can add text via the TEXT widget, copy and paste existing text or use the templates text place holders
Advanced Website Builder - Images
Points to note:
- You start by configuring the global website for both global images and global background
- You can add images via the IMAGE widget, copy and paste existing images or use the templates image place holders
- When uploading your own images, ensure the image file size is compressed and the image size is approximately to the size required on the website. You can use the Adobe image resize tool and use the Optimiziller file compression tool respectively
- Don't forget to take advantage of the vast selection of the free stock images available to you. Just type in a search term for the type of image you are looking for i.e. sun, computer etc
Advanced Website Builder - Images in a Row
This tutorial covers how to add, configure and modify images in a row using Tailor Brands advanced website builder.
Points to note:
- When uploading your own images, ensure the image file size is compressed and the image size is approximately to the size required on the website. You can use the Adobe image resize tool and use the Optimiziller file compression tool respectively
Advanced Website Builder - Photo Gallery
Points to note:
- When uploading your own images, ensure the image file size is compressed and the image size is approximately to the size required on the website. You can use the Adobe image resize tool and use the Optimiziller file compression tool respectively
Advanced Website Builder - Image Slider
This tutorial covers how to add, configure and modify the Image Slider using Tailor Brands advanced website builder.
Points to note:
- When uploading your own images, ensure the image file size is compressed and the image size is approximately to the size required on the website. You can use the Adobe image resize tool and use the Optimiziller file compression tool respectively
Advanced Website Builder - Adding Videos
Points to note:
- Uploaded videos are limited to 200mb - but at least this facility is available
- When uploading your own video, ensure the video file size is compressed using a video compression tool. You can use the Handbrake. Handbrake can really reduce your video size
Advanced Website Builder - Adding Icons
Points to note:
- You can create your own icon and saving this as a SVG file. Tutorial to follow
- I forgot to mention in the video but if looking to have more than 1 icon in a row, you can copy and paste the first icon once you have finished the design. This will copy the icon in a new column. You can do this as many times necessary
Advanced Website Builder - Adding Lottie Animation
Points to note:
- You can have fun adding Lottie Animation to your website but don't get too carried away
- Sign up for Lottiefile.com today
Advanced Website Builder - Adding Shapes
Points to note:
- Adding shapes may not be a popular addition to your website but they can be added and modified to your website
- Adding images into the shapes gives a different perspective
Advanced Website Builder - Before and After Slider
Points to note:
- We have used this widget on a building companies website showing the before and after build. This is a great use for this widget
Advanced Website Builder - Adding & Modifying Buttons
Points to note:
- We have used this widget on a building companies website showing the before and after build. This is a great use for this widget
Advanced Website Builder - Adding an Accordion
Points to note:
- This is really useful to use for FAQs
Advanced Website Builder - Adding Audio
Points to note:
- You will need to sign up with either Soundcloud or Mixcloud.
Advanced Website Builder - Adding a Facebook Feed
Points to note:
- You will need to create a business page in Facebook for this to work
Advanced Website Builder - Adding HTML & Javascript
Points to note:
- To add or change CSS, refer to the supplementary video below:
Advanced Website Builder - Adding Navigation Links
Points to note:
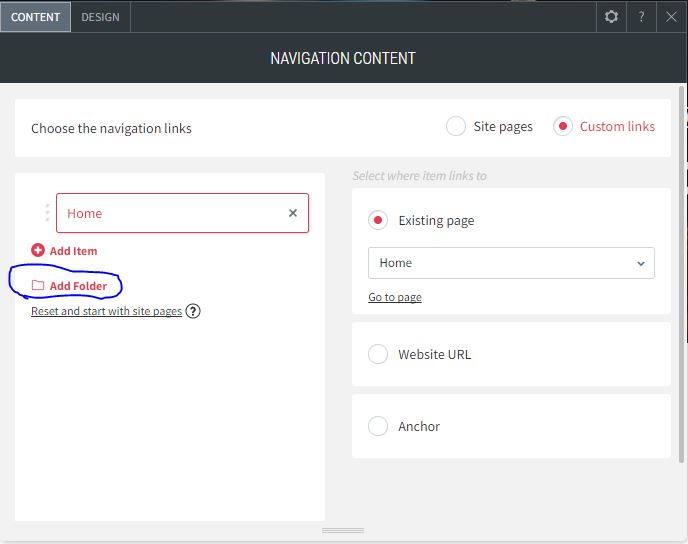
- If you wish to add a non clickable navigation menu item then you need to choose the "Add folder". Refer to the images below:
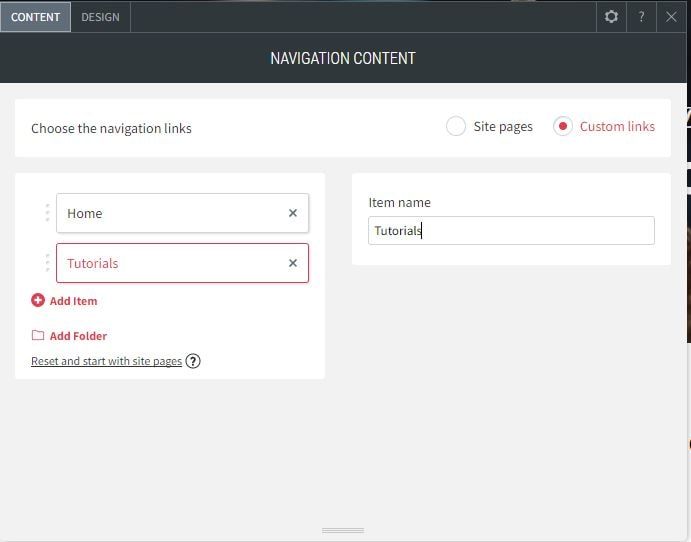
Give the folder a name - in case is "Tutorials"
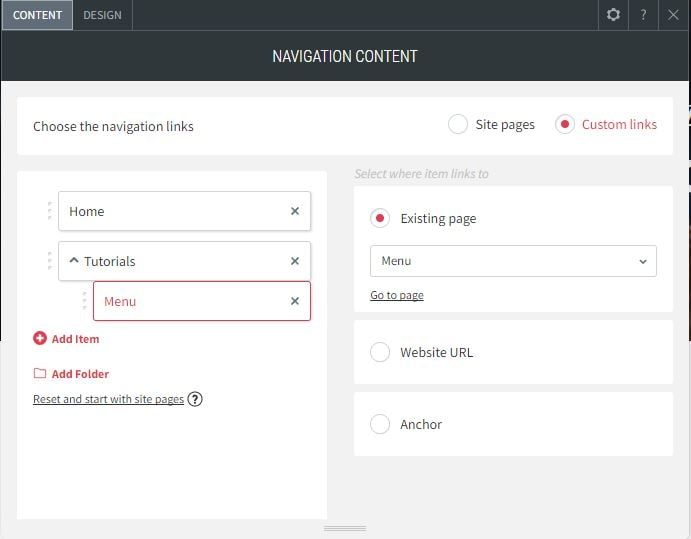
To add a sub-menu, add another item and select the page, anchor or website URL. Drag this menu item under the folder name - in this case "Menu" is dragged under "Tutorials".
Advanced Website Builder - Google Calendar
Points to note:
- You will need to have a Google account for this widget to work for you
Advanced Website Builder - Notification Bar
This tutorial covers how to add a notification bar at the top of your website using Tailor Brands advanced website builder. This can be triggered by different circumstances and appear on selected pages.
Points to note:
- You will need to subscribe to at least the standard subscription to use this facility.

